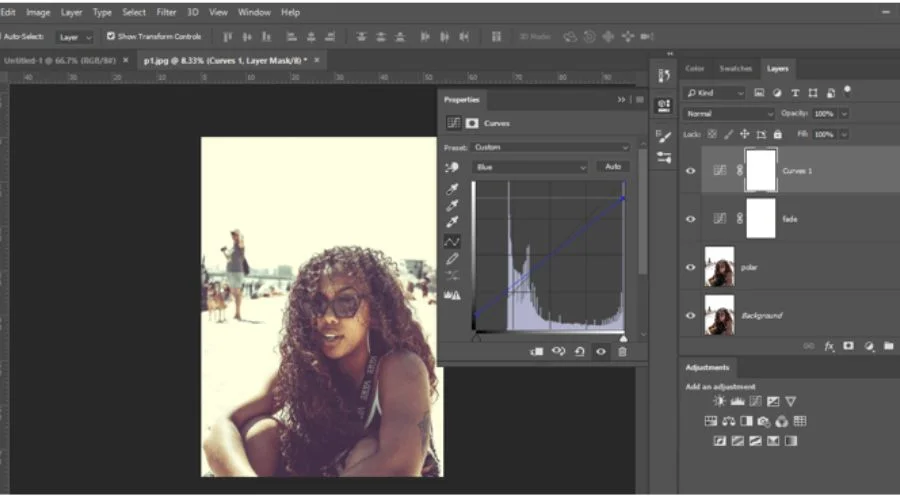
The Polaroid effect is a popular photo filter that replicates the look of an instant camera print. This effect has become a staple in photo editing and is widely used in various creative fields, from social media to advertising. Read on to know more about the polaroid effect in Photoshop and the polaroid filter effect.
Benefits of using the Polaroid Effect in Photoshop

The Polaroid effect is a popular technique used in photography to simulate the appearance of a classic Polaroid instant film photograph. This effect has become increasingly popular in recent years, especially in social media, where users enjoy the vintage aesthetic that it provides. Fortunately, with the advent of digital photo editing software, anyone can now recreate the Polaroid effect without needing an actual Polaroid camera.
Adds a vintage and nostalgic look to photos
One of the main benefits of using the Polaroid effect in Photoshop is the ability to add a vintage and nostalgic look to photos. The Polaroid effect can make your photos look like they were taken several decades ago, giving them a unique and timeless aesthetic. This is especially useful for images that have sentimental value, such as family photos or photos of significant events.
Also, Read- The Ultimate Guide To The Adobe Photoshop Lightroom Classic
Creates a cohesive look for a series of photos
Another benefit of using the Polaroid effect in Photoshop is that it can help create a cohesive look for a series of photos. By applying the same Polaroid effect to all of your photos, you can create a consistent and cohesive visual style that ties them together. This can be especially useful for photographers or social media users who want to create a specific visual theme or aesthetic.
Emphasizes the subject of the photo
The Polaroid effect in Photoshop can also help emphasize the subject of the photo. By adding a white border around the image, the viewer’s eye is naturally drawn to the centre of the photo, which is where the subject is typically located. This can be useful for portrait photography or any photo where the subject is the main focus.
Adds texture and depth to photos
The Polaroid effect in Photoshop can also add texture and depth to photos. The muted colour palette and the addition of a white border can create a sense of depth and dimensionality to the image, making it appear more tactile and tangible. This can be especially useful for still-life photography or any photo where texture and detail are important.
Provides a creative outlet for experimentation
Finally, using the Polaroid effect in Photoshop can provide a creative outlet for experimentation. By playing around with different settings and adjustments, you can create a wide range of Polaroid effects, each with its unique look and feel. This can be a fun and rewarding way to explore your creativity and experiment with different visual styles.
Creating the Polaroid effect in Photoshop

Step 1: Select your photo
To create the Polaroid effect, we need to start with a photo that we want to edit. Open your chosen photo in Photoshop and create a new document with the same dimensions as the photo.
Step 2: Add a white border
The Polaroid effect is characterized by a white border around the image. To create this border, select the Rectangular Marquee Tool and drag it around the photo, leaving a small space between the edge of the photo and the selection. Then, create a new layer and fill the selection with white.
Step 3: Round the corners
Next, we need to round the corners of the border to make it look more like a Polaroid print. Select the Rounded Rectangle Tool and draw a shape around the white border. Adjust the corner radius until you get the desired shape, then create a layer mask and apply it to the white border layer. This will hide the corners and create a rounded shape.
Step 4: Add text
Polaroid prints often include a caption or a label at the bottom of the photo. To add text, select the Text Tool and click on the bottom of the white border. Put in some writing here, and then change the style, size, and colour as you see fit.
Step 5: Add a drop shadow
To give the Polaroid effect more depth and dimension, we can add a drop shadow to the white border. Double-click on the white border layer to open the Layer Style dialog box. Select Drop Shadow and adjust the settings until you get the desired effect.
Step 6: Apply a vintage filter
The final step in creating the Polaroid effect is to apply a vintage filter to the photo. There are many filters available in Photoshop that can help achieve this effect, such as the Color Lookup Table or the Gradient Map. Choose a filter that suits your photo and adjust the settings to your liking.
Also, Read- Mastering Adobe Photoshop Lightroom: A Comprehensive Guide
Conclusion
The Polaroid effect in Photoshop is a fun and easy way to add a vintage and nostalgic feel to your photos. With just a few simple steps, you can create a Polaroid-style print that looks like it was taken with an instant camera. Experiment with different filters and techniques to create your own unique Polaroid effect. For more information, visit Savewithnerds.
FAQ’s


